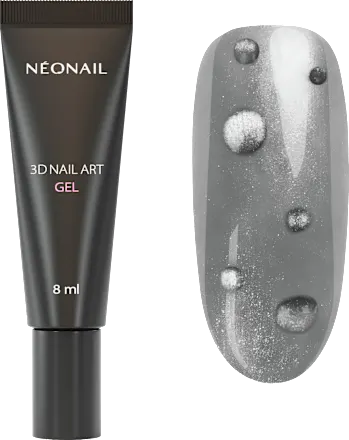
3D Nail Art Gel Tube, 5 g
€ 11,95
Description
Product description
- UV gel for 3D nail art
- Precise application of 3D designs
- Lasts up to 21 days
- Easy application directly from the tube
With NÉONAIL 3D Nail Art Gel from the tube, you can quickly and easily create trendy, three-dimensional nail designs. Thanks to the practical tube with its slim applicator tip, application is precise and straightforward, directly onto the nail, without the need for any additional tools. The gel’s thick consistency is ideal, as a single layer is sufficient to achieve an impressive 3D effect. This gel adds a special touch to any style and ensures a stunning UV manicure that remains chip- and scratch-resistant for up to 21 days.
dm article number: 3111365
GTIN: 5904553696213
Product features
Base color :Transparent
Effect :Long-lasting
Texture / Consistency / Application :gel
Warning notices
For professional use only. Read instructions carefully. Avoid skin contact. Avoid eye contact. May cause an allergic reaction. Discontinue use if irritation occurs. Keep out of reach of children.
Ingredients
INGREDIENTS: Bis-HPMA Poly(1,4-Butanediol)-14/IPDI Copolymer, Hydroxypropyl Methacrylate, Silica, Ethyl Trimethylbenzoyl Phenylphosphinate, BHT, p-Hydroxyanisole, Cl 60725
Instructions for use
Step-by-Step Instructions: 3D Design Step by Step Step 1: Shape the nails using a 100/180 grit file. Then, carefully remove the cuticles with a rosewood stick by gently pushing them back. Step 2: Next, buff the nail surface with a polishing file or buffer. Remove the resulting nail dust with a cellulose pad soaked in cleaner. If necessary, a thin layer of primer can be used to degrease the nails. Step 3: Apply a thin layer of base coat and cure it under a UV/LED lamp according to the chart. Do not cleanse the nails afterward. Step 4: Apply a thin layer of UV nail polish and cure it under the UV/LED lamp according to the chart. Repeat the process with a second thin layer. Do not cleanse the nails in this step either. Step 5: Now, seal the UV manicure with a top coat (e.g., top coat sunblock or hard top coat) and cure it under the UV/LED lamp according to the chart. Note: A top coat must be used where the sticky layer is removed with a cellulose pad soaked in cleaner after curing. Do not use a top coat without a sticky layer. Step 6: Apply the gel directly from the tube to the nail, shaping the desired design. The gel will not run during application. However, for very intricate nail art, it is recommended to cure individual parts of the design in between to make application easier. Step 7: Cure the gel in the UV/LED lamp. No further top coat is needed. Step 8: After removing your hand from the lamp, wait a few seconds and then wipe the nail with a cellulose pad soaked in cleaner. 3D Design with Nail Powder Step by Step Step 1: Shape the nails with a 100/180 grit file. Then carefully remove the cuticles with a rosewood stick by gently pushing them back. Step 2: Next, buff the nail surface with a polishing file or a buffer. Remove the resulting nail dust with a cellulose pad soaked in cleaner. If necessary, a thin layer of primer can be used to degrease the nails. Step 3: Apply a thin layer of base coat and cure it under a UV/LED lamp according to the table. Do not cleanse the nails afterward. Step 4: Apply a thin layer of UV nail polish color and cure it under a UV/LED lamp according to the table. Repeat the process with a second thin layer. Do not cleanse the nails in this step either. Step 5: Depending on the powder chosen, apply DRY TOP or a top coat with a sticky layer and cure it under a UV/LED lamp (cure DRY TOP for only 10 seconds). Step 6: Carefully work the powder into the top coat with an applicator.Remove excess powder with a soft brush. Step 7: Apply the gel with a brush and shape it as desired. The gel won’t run during application; however, for very intricate nail art, it’s recommended to cure individual parts of the design in between to make application easier. Step 8: Cure the gel under a UV/LED lamp. Step 9: After removing your hand from the lamp, wait a few seconds and then wipe the nail with a cellulose pad soaked in cleaner. This removes the powder from the nails, and the effect will only be visible where gel was applied. Step 10: Apply a top coat to seal the nail design.
Company address
Cosmo Group Sp. z oo Sp. K. Jasielska 10A, 60-476 Poznań, Poland

Reviews
There are no reviews yet.